
 Hejing Li
—
Wed, Aug 21, 2024
Hejing Li
—
Wed, Aug 21, 2024
SimBricks has been completely rewritten to enable new use-cases and better usability. Therefore the Python code shown here is outdated. For details check newer blog posts or our documentation.
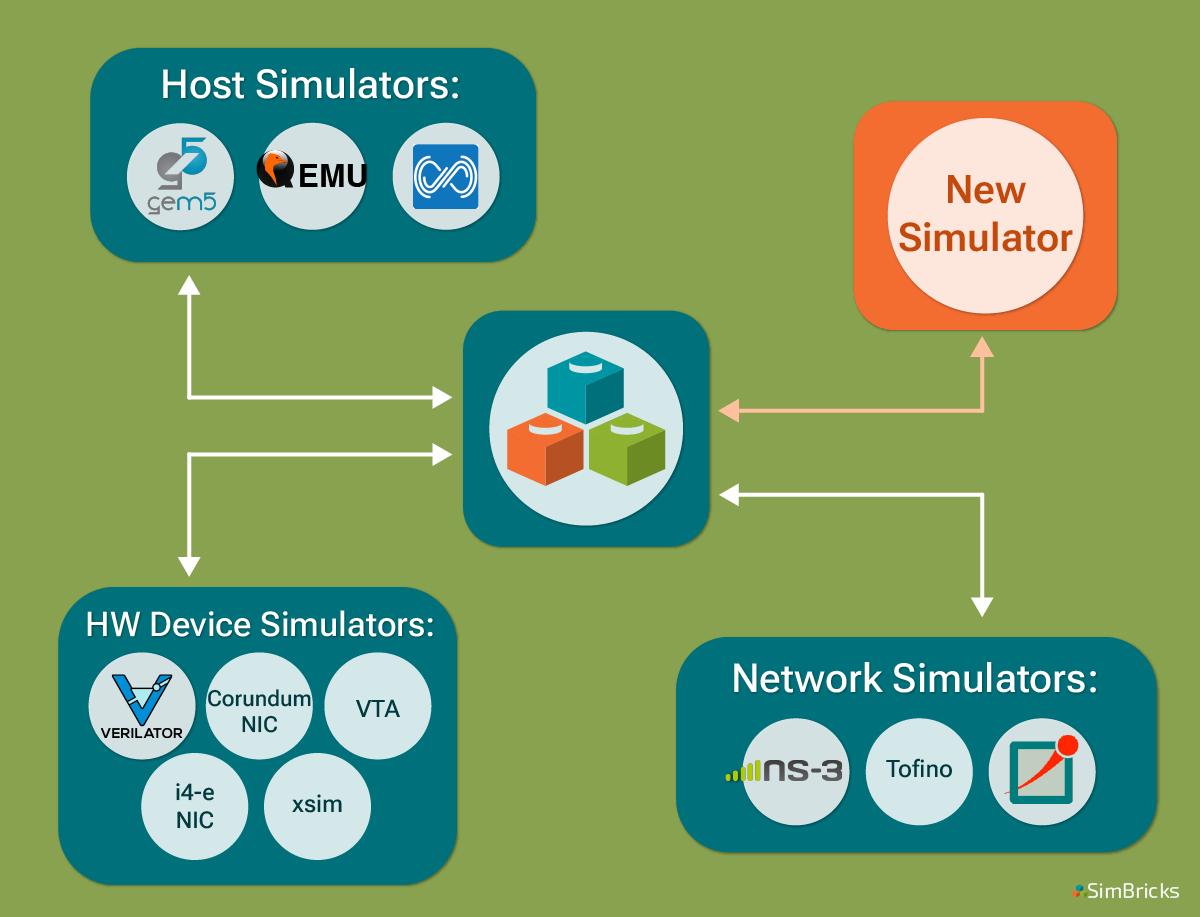
SimBricks enables the modular integration of multiple simulators to create full system simulations. Our previous post introduced how we accomplish this by defining standardized interfaces to which simulators connect. To integrate a new simulator with SimBricks for the first time, a user needs to implement an adapter between the SimBricks interface and the simulators internal abstractions.
In this blog post, we discuss practical aspects of implementing these adapters. We will delve into essential concepts and provide step-by-step guides to help you effectively integrate your simulators into SimBricks.
Understanding the Interface and the Message Types
SimBricks interfaces are based on the natural components boundaries, with simulators connected through message passing via these interfaces. For instance, a PCIe interface links a host to a hardware device, while an Ethernet interface connects a NIC simulator to a network simulator.
The first step in integrating simulators is to understand the specific interface
and message types involved. For example, the SimBricks PCIe interface models
slightly abstracted PCIe transactions, where message types between the device
and the host include INIT_DEV, DMA_READ/WRITE/COMPLETE,
MMIO_READ/WRITE/COMPLETE, and INTERRUPT. Here is a concrete example of the
DMA_WRITE message:
struct SimbricksProtoPcieD2HWrite {
  /////////////////////////////////////////////////////////////
  // DMA Write Header
  uint64_t req_id; // ID to match with future read completion
  uint64_t offset; // Address to read
  uint16_t len;    // Number of bytes to read
  uint8_t pad[30]; // Pad header to full cache-line size
  /////////////////////////////////////////////////////////////
  // Standard SimBricks Header Fields
  uint64_t timestamp;
  uint8_t pad_[7];
  uint8_t own_type;
  /////////////////////////////////////////////////////////////
  // Message payload
  uint8_t data[];
} __attribute__((packed));
The full list of PCIe messages is here, and we have anologous definitions for our our memory and Ethernet interfaces. Messages are comprised of a type-specific cache-line-sized header and an optional variable length data payload. The overall message size, is fixed by the channel parameters configured at runtime. The header starts with message type specific fields, and ends with standard SimBricks message fields for synchronization and message identification.
As we will see below, the adapter interprets these incoming messages and translates them into actions within the simulator. Similarly the adapter sends messages to pass events to its peer over the channel.
Implementing the Adapter
Once we determine the interface, we can begin writing an adapter. For illustration, we use an example from our repo where we integrate a matrix multiplication accelerator as a PCIe device. At a high level, implementing an adapter involves three key components:
- Adapter initialization
- Handing incoming messages
- Implementing polling & synchronization
Adapter Initialization
During startup, the adapter has to establish connections with its peer simulators. This also includes an initial protocol-specific welcome message. In the case of PCIe, the device simulator will send the device information message to the host during this process, including device identification information, BARs, supported interrupts, etc.. The SimBricks library provides helpers to establish connected channels.
Handling Incoming Messages
The main simulation loop polls the incoming queue for each channel. Once a
message is ready for processing, the adapter interprets the message from the
SimBricks channel and calls the corresponding internal simulator functions to
process the event. This function typically boils down to a switch case to handle
each message type. Below is an example from our Matrix Multiplication
accelerator for handling an MMIO_READ message received from the PCIe channel.
static void PollPcie(void) {
  volatile union SimbricksProtoPcieH2D *msg =
      SimbricksPcieIfH2DInPoll(&pcie_if, main_time);
  uint8_t type;

  if (msg == NULL)
    return;

  type = SimbricksPcieIfH2DInType(&pcie_if, msg);
  switch (type) {
    case SIMBRICKS_PROTO_PCIE_H2D_MSG_READ:
      MMIORead(&msg->read);
      break;

    case OTHER_TYPES_OF_MESSAGES:{
      // Handle other types of messages
    }
Implementing Polling & Synchronization
Once message handling is ready, the next step is implement the channel polling and synchronization logic. The details here heavily depend on the specific simulator’s mechanics. A basic simulation model as in the example above might simply poll for messages in the simulation loop, and advance the simulation time according to the minimal next message timestamp for synchronization (see our recent synchronization post). For more complex discrete event-based simulator with scheduled event queues, the logic is slightly more complex. At a very high level, the adapter schedules an event for processing the next message, and at the end of this handler polls for the next message and re-schedules the event (see our gem5 adapter as an example). This ensures that the simulator clock does not proceed ahead of the next message. Additionally, the simulator also needs to periodically send out dummy messages to allow its peer to progress when no data messages have been sent.
Adding the Simulator to the Orchestration Framework
Lastly, we need to add the simulator to our orchestration framework. Create a simulator class that inherits from the PCI device simulator class and configure the command to run the simulator. With this simulator class defined in the orchestration framework, we can invoke it in the experiment script and run it alongside other components in an end-to-end environment. For further guidance to the simulation script, refer to our previous blog post on running a simple experiment with the orchestration framework.
# Simulator component for our accelerator model
class HWAccelSim(sim.PCIDevSim):
    sync = True

    def __init__(self, op_latency, matrix_size):
        super().__init__()
        self.op_latency = op_latency
        self.matrix_size = matrix_size

    def run_cmd(self, env):
        cmd = '%s%s %d %d %s %s' % \
            (os.getcwd(), '/accel-sim/sim', self.op_latency, self.matrix_size,
             env.dev_pci_path(self), env.dev_shm_path(self))
        return cmd
This post has provided an initial overview of the steps for integrating a new simulator into SimBricks and run it in an end-to-end environment. If you have any questions, please reach out:


